Direct Warp The Loom 1
.png)
For this, I had to warp the loom backwards from front to back. I started by attaching wool around the front warp rod with notches in, then though the heddle and to the warping pegs located about 2metr away and then repeating back and fourth.
Direct Warp The Loom 2
.png)
Each time I repeat this I take a fresh loop of wool through the reed and passing it through the next heddle along.
Direct Warp The Loom 3
.png)
I have completed the tooing and throwing and the right amount of wool is now on the pegs and front beam.
Loading The Loom 1
.png)
I have unattached the wool from the pegs and start winding it onto the beam but not too far because I still have to feed through each loop through the heddle eyes.
Loading The Loom 2
.png)
Once all the wool (which I think we can now call the Warp) is in it’s right place I start attaching it to the slots in the front beam and tie it off.
Loading The Loom 3
.png)
Here you can see the warp as it is cut, thread through the heddle eyes and then tied on the front beam.
The Loom Is Now Warped
.png)
All the warp is threaded trough the heddle and it’s eyes tied on the back and front beam, all ready for the weft to be weaved through, which is about to be wound onto the shuttle sticks.
Starting The Weft
.png)
You will notice here when I sarted I did a few weaves of a Weft in pink yarn I had some spare bits. This is so there is a buffer when I remove it all from the loom at the end of weaving.
Changing Colour Of The Weft
.png)
Each time I change colour I have a bit of Weft leftover and most people would neatly tuck this in using darning type needle, but as this is a Rustic Scarf and being not so good at sewing I have justed tied each of them together.
Keeping The Warp And Woven Cloth Seperated
.png)
You will note here also there are rolls of brown paper that are feed into the front and back beams seperating the Warp and Woven Cloth to help keep them seperated. It is at this point in the weaving I will feed in the paper to the front beam. It is just a case of now contiuning weaving through till all is on the front beam.
Finished Scarf
.png)
Here you see the finished scraf, it has been removed from the loom the ends tied off and cut, just have to put me signiture on it and it’s done.
Adding My Signeture
.png)
My signeture is applied by way of a lable as seen here.
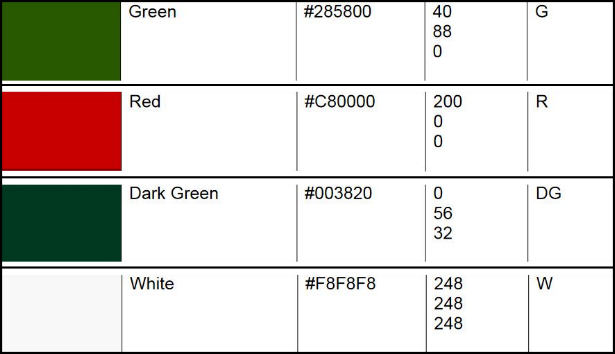
Welsh Tartan Colours

You will note that the colours of the Welsh Tartan is not fully correct here, this is because I’m not that good at doing this sort of thing and this is the only wool I had. But here are the correct colours for you to do your own. Next time will get the right colours and try tucking in my ends.


© Copyrigh - Note this page is for education purpose only and content copied only for those reasons and within reasonable use.